Shooting in the mountains. Tips for Beginner Photographers
Hiking in the mountains is an opportunity to breathe in a breath of clean, refreshing air, feel the adrenaline in your blood, the rushing wind blowing through your hair, and the warm rays of the sun on your skin. And, of course, admire the impressive panoramas of mountain ranges and the amazing beauty of the mountains. Everyone who has been to the mountains has an irresistible desire to photograph mountain landscapes and leave as a memory the wonderful sensations from their exciting hike. Even those who have never seen these huge massifs with their own eyes are moved by photographs of the mountains. However, shooting in the mountains has its own specifics. Photographs should convey all the beauty that the photographer sees through the lens of his camera. And here you have to take into account a number of nuances.
Mountain photography is a lot like regular landscape photography. For example, regarding what time is best to choose for shooting. Experienced travel photographers agree that the most beautiful photos The images of mountain peaks and their surroundings are obtained at sunset and dawn, which is primarily due to the softness of the shadows and warm light.
At the same time, photographing mountains has its own characteristics that the photographer needs to remember. Do not forget that in the mountains the weather changes very quickly, and sometimes completely unpredictably. The same applies to changes in lighting conditions - they also occur rapidly, which significantly complicates the photographer’s work. If clouds begin to obscure the sun in the mountains, the lighting changes more noticeably than under normal conditions, since the difference between light and shadow is too great. A photographer should always be prepared for unpredictable weather. The necessary equipment for a photographer who wants to shoot in the mountains is waterproof, warm clothing and mountain boots with non-slip soles.
The air in the mountains becomes increasingly thinner with increasing altitude. In terms of photography features, this results in the presence of a very saturated color of the sky - blue with a tendency to blue. This color occurs due to the high proportion of ultraviolet radiation in the light spectrum. High levels of ultraviolet radiation at significant altitudes in the mountains also cause a bluish haze to appear in the distance.

In mountainous conditions, a strong contrast in illumination and color temperature between areas located in the shade and in the sun becomes noticeable. Since the contrast with sunlight in the thin mountain air is pronounced, photographers prefer to set exposure for well-lit areas rather than shadows.
Photographic equipment
So, let's start with what you will need to take photographs in the mountains, and what requirements apply to the photographic equipment used. As for the camera, it is quite obvious that it should not be too large and bulky so as not to interfere with you too much during an exhausting mountain hike. At the same time, a regular point-and-shoot, even with some advanced functionality, will not work.
Ideally, the camera should not restrict your movements in difficult mountain conditions, while providing all the opportunities for full-fledged shooting. The camera must have a durable, reliable waterproof body so that it is not afraid of any light rain or dust. This is important in mountainous conditions, where, as we have already found out, the weather changes rapidly. You can take some kind of protective rain cover for your camera.
A lens for photographing mountains must be capable of multiple optical zooms. After all, in the mountains it is not always possible to move freely from one point to another, choosing the most suitable angle. A camera with a good zoom expands the photographer's capabilities for shooting interesting objects at different distances. In principle, experienced photographers use two types of cameras for mountains - a lightweight “road” camera, which does not restrict movement at all during transitions, and a “creative” SLR camera, which is reliably protected from moisture, dust and mechanical damage, and provides wider shooting opportunities .

Landscapes are shot primarily with wide-angle lenses, since such optics allow you to get clear, well-focused shots, both in the foreground and in the background. Also, a wide-angle lens makes objects in the foreground larger and those in the background smaller, thereby creating a sense of space. For shooting in mountain gorges, short-focus wide-angle optics are best suited, allowing you to cover the entire panorama. However, if you use an ultra-wide-angle lens, it will significantly remove the background, unpleasantly distorting the space.
Long-focus optics can also be useful, as they provide the ability to photograph distant mountain peaks and allow you to place several objects at different distances in the frame at once. It is recommended to take a small set of interchangeable lenses with you to the mountains, for example a 17-70mm zoom lens and a 70-200mm telephoto lens. Instead of a zoom lens, you can use optics with a fixed focal length and high resolution. In particular, a 28mm lens will be sufficient.
In addition to optics and a camera, you will most likely need a tripod. However, carrying a tripod with you while moving in the mountains is not an easy task. A heavy and bulky tripod, although it will be more stable in high wind conditions, is still better left at home. Carrying such a weight with you for several hours, you are unlikely to be able to concentrate on the quality of your pictures. When you're tired, your photos often turn out bad. Experience shows that in the mountains every gram is worth its weight in gold. Of course, you need a tripod, but ideally it should be both stable and lightweight. For example, you can use a three-piece tripod with a universal ball head.
Additional accessories you can take with you to the mountains are polarizing and gradient filters. A polarizing filter helps you take more beautiful pictures of the sky, while a gradient filter helps you get more exposed shots when there is a significant difference in contrast between the sky and the ground. Also, before going to the mountains, you should check that there is an empty flash drive in the camera and a spare one, plus it is recommended to get an additional battery. Two memory cards and two power supplies are all extremely necessary, because in the mountains you will not be able to find an electrical outlet or a store selling photo accessories.
Having decided on the necessary set of photographic equipment, let’s move on directly to the specifics of shooting in the mountains. Perhaps the most important point when shooting in the mountains is determining the correct exposure. In mountainous conditions, the contrast is very high, and if the weather is bright, sunny, and snow or a rich blue sky falls into the frame, the built-in exposure meter tends to slightly overestimate its readings, as a result of which the frame turns out to be too dark. Since lighting conditions in the mountains can change very quickly, it is better to use aperture priority mode rather than manual shooting mode. ISO sensitivity is usually set to its minimum level. If you are shooting from a tripod on a clear sunny day, then it is recommended to shoot in the aperture range from 8 to 11. In cloudy weather, you should open the aperture a little more.

The most important question is how to measure exposure? Here photographers use different methods. For example, the lightest area in the middle or near background is selected, against which the exposure is measured. It is better, of course, to avoid high-contrast photographs and compose the frame in such a way that the lighting is more or less uniform. In general, it is optimal to expose on an object of medium brightness in order to obtain high-quality results. However, when shooting beautiful sunsets or sunrises in the mountains, it makes sense to determine the exposure by a section of the sky located approximately twenty to twenty-five degrees above the sun.
You can use single autofocus with center focusing, and you need to specify in the camera settings so that when the focus is locked, the exposure value does not change. This allows you to use a refocusing technique. You center the viewfinder at the desired point, press the shutter button halfway, and then move the camera in one plane (without changing the distance to the subject) to get an interesting composition. Next, frame to your liking and press the shutter button all the way. In this way, you can ensure that exactly the object you need is sharp in the frame, and the exposure will be measured based on it.
If you shoot without a tripod, then to get sharp photos it makes sense to use a stabilization system, preferably one that is built into the lens. When shooting from a tripod, vibrations created by changes in the arrangement of lenses in the lens or the position of the matrix in the camera body can affect the clarity of the image, so in this case it is better to turn off the stabilization system. When using a tripod, it is recommended to activate the timer (self-timer) for two seconds or take care of the remote control.
Since we most often see mountains from below, it may be worth looking for more interesting angles than simply shooting at the foot of the mountains or from the road. Such photographs are unlikely to attract the attention of the viewer; they are ordinary and accessible to everyone. If you want to create truly impressive and interesting photographs of mountains, then it is better to choose angles from unusual positions, for example, from top to bottom. To do this, you will need to climb to the top (if possible) or climb as high as possible and take pictures parallel to the horizon, or from the top angle down.

In the mountains, use backlight and silhouettes more often, do not forget to shoot against the sun - you often get very bright, unforgettable shots. Look for bright, rich colors in the mountains, especially at dawn and dusk. During any hike along the way, you will often encounter objects that seem to have nothing to do with the theme of mountains. For example, ancient buildings or modern buildings. It would also be nice to photograph them against the backdrop of the mountains.
If you have chosen a mountain scene for shooting, it is recommended to take a few additional frames to the left and right of it with the same exposure settings - perhaps when processing the images you will be able to make a more voluminous panorama or at least add horizontal space to your photograph. For scale, you can use a person in the frame, in addition, this will give special authenticity to your photo.
When going to the mountains with a camera, do not forget about your safety. In the mountains, twisting your leg or getting any serious injury costs nothing. Therefore, before going to the mountains, you should carefully study the topography of the place where you are going, the weather conditions, the most interesting places and the dangers that lie in wait. The best option is to find a guide who has lived in a particular area for many years and knows almost everything about it. With the help of such an experienced person, you will be able to ensure the creation of the most favorable conditions for your trip and photography in the mountains.
Mountains are a special world. Mountains are an amazing natural landscape that has its own unique characteristics. The laws of “life” in the mountains are completely different, these laws are completely different from the laws of the sea or the plain, the forest or the city... Everything is different in the mountains. And every person who is captured by them feels this. And for a photographer or artist, the mountains can present magnificent landscapes. The mountains offer unique conditions for photography. But, at the same time, they pose many tasks for the photographer, which can be quite difficult for a novice photography enthusiast to solve.
As you already understand, in our article today we want to tell you about shooting in the mountains. And, of course, we will try to inspire you to be creative, to move you a few hundred meters closer to heaven. And do this, of course, with a camera.
Folding and height of mountain relief
Unless you're new to photography, you most likely have experience shooting in flat terrain. Well, for example, somewhere in middle lane Russia. And during your work, you have probably encountered the following problem: an absolutely flat landscape stretches out in front of you, and your gaze is constantly resting on something: a forest, for example, or some building. And in order to make a decent landscape, you have to look for some elevated place. From such a point you can choose a more interesting angle, and in general the view of the landscape will be completely different. That is why many more or less experienced photographers often shoot landscapes on the plain either from a steep river bank, or from some hill, or from the roof of a house, or from some kind of tower.
When shooting in the mountains, this problem disappears by itself. It is decided by the mountains themselves. After all, being on a mountain, at a certain height, a photographer can look very far. And between the mountains you can often catch a very interesting play of light and shadow. And in general, mountains are simply a magnificent backdrop for a wide variety of photographic subjects.

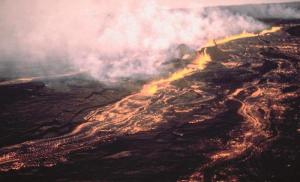
Rapidly changing weather
The weather in the mountains is very unstable and fickle. It can change completely within a very short period of time. Just look at these two pictures. Only three minutes passed between the first and second frame! Such rapid changeability of the state of nature for a photographer has both its advantages and certain disadvantages. What's the plus? The fact is that in one shooting day you can photograph rain in the mountains, fog, and a bright blue sky with beautiful clouds above impressive mountain peaks, and even snow and frost on mountain plants!

For some reason, many people believe that rush is alien to landscape photography, that the landscape genre does not require the photographer to work very quickly. But only those who have never filmed in the mountains think so. In order to capture some interesting state of nature in the frame, for example beautiful and effective lighting, you often need to act very quickly. Sometimes decisions have to be made simply at lightning speed. In the same way, for example, as when working on a photo report. This is precisely the main difficulty of photographing in the mountains. It happens that you have to rush headlong with a tripod at the ready to the desired point, and even on the go think about what kind of light filter to put on the lens, so that, for example, the clouds in the picture turn out brighter in the conditions of this or that lighting, which sometimes can last only one or two minutes!
Well, in terms of everyday life and comfort, in terms of protecting your photographic equipment, the changeable weather in the mountains forces you to have protection from rain and cold.
Unusual mountain nature
The nature in the mountains is very different from the nature of the plains. In the mountains, other trees and herbs grow, completely different flowers bloom. Yes and fauna in the mountains is also not similar to what can be seen in flatland nature. And, moreover, all this changes depending on the height of the mountains, on the height of the habitat of animals and plants. The flora and fauna of the mountains, by the way, can become one of the separate themes of your photographs.

Many photographers are used to shooting models in a studio setting. Some people take up street photography and look for interesting types on the busy streets of big and small cities. Or maybe it’s better to forget about all this for a while and go to the mountains? Look for people there? We assure you, residents mountainous areas no less interesting from a photographic point of view than the inhabitants of cities! They have a very interesting appearance, original costumes that are unusual for us... Even their eyes glow completely differently! Just look at this picture. It shows an elderly resident of the village of Pitomine, located at the foot of mountain range Durmitor in Montenegro.
Features of planning and organizing photography in the mountains
Mountains are a special place. It is not so easy for an ordinary city dweller to get to the mountains. This is not at all like stopping at the store on the way from work for a loaf of bread and a carton of milk. You need to go to the mountains prepared and properly equipped. Yes, in our case, he will also take care of the photographic equipment. And she, as you know, is not only heavy, but also quite tender.
First, let's talk about how to get to the mountains. How to get to them.
Visiting places accessible to tourists
This way to get to the mountains can easily be called the simplest and most affordable. You just need to join the main tourist flow to some attraction in certain places where you decide to visit and photograph. Here you won’t need much effort or any hard-to-develop skills. But the disadvantage of such a visit to the mountains is that you will not see real, wild, pristine mountain nature. Yes, of course, you will be in the mountains, but nevertheless, among a huge number of people...
Just look at this picture. It was taken on a specially equipped observation deck on Mount Lovcen in Montenegro. This mountain is considered one of the most, perhaps, the main attractions of the Montenegrin seaside. At its top is the mausoleum of the local ruler Petar Njegos. This place is actively visited by tourists almost all summer, from May to October. In winter there are no excursions to Mount Lovcen. This is due to the fact that in winter mountain roads sweeps away the snow.

Individual trip by transport
If you have your own car, or you rented one, then, of course, you can go anywhere. Well, of course, to places that can actually be reached by car. By the way, you can drive quite far by car, even at first you may not even imagine where, to what remote and protected places. But, nevertheless, never forget about your own safety: mountain roads do not always have good coverage and often driving along them by car can be downright dangerous. Especially in bad weather or winter. That’s why, when choosing a car for a trip to the mountains, opt for an all-wheel drive car or a car with high ground clearance. Well, those who can afford it can get to the shooting location by other means of transport. For example, on horseback or even in a helicopter.
Walking trip
Despite progress, the rapid development of science and technology, the improvement of our life, humanity has still not invented practically anything for traveling in the mountains. The best thing a person has for these purposes is his own legs. To the vast majority interesting places the mountains can only be reached on foot. Exclusively on foot and nothing else. Well, or on some donkeys or donkeys. But you are unlikely to have the skills and experience of such movement. For this simple reason, most photographers who shoot in the mountains usually have the skills of mountain tourism and mountaineering. So if you are not afraid to walk 5-7 km, spend the night in a tent, or cook stew over a fire, then this option is quite suitable for you. But, nevertheless, if you think that you do not have sufficient skills and the necessary experience, it is better not to go to the mountains alone. In any extreme situation, your friend and companion will always come to your aid. Most best option such a hike is several people united by the same interest. In this case - a photograph. Only they will understand you, for example, if you suddenly see an interesting stone and “hang” near it for an hour, trying to find the right angle and lighting. Or when you wake up everyone in the tent at five o’clock in the morning so that they, like you, can enjoy the beautiful sunrise.

Such photo trips require special, very careful preparation, clear planning, and detailed elaboration of the route using maps. All this is needed in order to be able to shoot at different times in different places, under different lighting conditions, at different heights, and so on. And overnight stays should also be planned in places suitable for recreation.
Today in the tourism market there is even special offers. Some travel agencies organize special tours for photography, including mountain tours for photographers. If it is difficult for you to organize such a trip yourself, you can use the services of specialists.
Well, now we will offer you some tips on how to take photographs in the mountains, how to get truly beautiful and memorable shots. This no longer depends on what type of travel you will use.

Set specific goals for yourself before you start filming.
Even before you start shooting, we recommend that you clearly decide what genre you will shoot in and what type of subjects will be interesting to you. First of all, based on this, you will need to choose a mountain travel route. The set of photographic equipment that you will need for this or that job also depends on this. There are a lot of options here. After all, in the mountains you can shoot not only landscapes, but also portraits. You can make reports, create ethnographic photo projects, do macro photography and much, much more. While still at home, you need to decide for yourself: either you will take pictures of everything, like an ordinary tourist with a point-and-shoot camera (in this case, it is often very difficult to get good pictures...), or you will set a specific goal and concentrate specifically on it one. In this case, your chance of getting a really good shot increases significantly.
The route of a mountain trip needs to be carefully planned
A clear route plan is a must. No matter which way you travel. On the route, you need to clearly mark all the key points for shooting and overnight stays. Shooting points can be places where you can take a photo, for example, a beautiful landscape, or something that interests you natural object, mountain village or something else. The overnight stay must have a source of water. There should be a place to pitch a tent. It’s good if the overnight location and the shooting location coincide. In this case, you will be able to take pictures of this place in different lighting, at different times of the day, under different weather conditions.
What you need to take with you
It goes without saying that when you go hiking in the mountains you will have to take more than just a camera with you. You will need a lot more equipment. You can read about purely tourist and hiking equipment, about clothes and shoes, about the quantity and quality of food and water on special tourist sites, and we will not be distracted by this now. Let’s focus specifically on what photographic equipment and accessories you may need on a mountain hike.
Don’t forget that every extra gram in your backpack on a hike, especially in the mountains, can be quite noticeable. All hiking enthusiasts, including tourist photographers, know this. That's why it makes no sense to take all the camera equipment you have with you. In this case, you may simply not reach the final point of the route. IN hiking you need to take only what you really need. Only the essentials. As we said above, you need to decide on a set of photographic equipment in advance, depending on what goal you have set for yourself.
Camera

The camera is the main tool of the photographer. There is no need to talk about this. Naturally, you need to understand that serious work requires a serious camera. Of course, we are talking about a DSLR camera. Why do you need this particular camera? - the amateur will ask. Isn’t it easier to take a lighter camera, because “it sometimes has more pixels?” We will answer. A DSLR camera has manual settings, you can change lenses, and it is quite heavy. All this is very important to get good results. Even the weight. A heavy camera feels more secure in your hands and creates less vibration when shooting.
Most of the modern SLR cameras, however, do not have very large weight and dimensions. For example, today's popular Nikon D3300 weighs only 430 grams. And the fairly advanced full-frame Nikon D750 weighs 840 grams.
Of course, compact cameras are much lighter. Why? Yes, because the bulk of the mass of photographic equipment falls on optics. And it doesn’t matter whether you have a DSLR or mirrorless camera. The lenses weigh about the same. And one more important detail. Compact mirrorless cameras last much less time on a single full battery charge than DSLR cameras. It follows that the low weight of such a camera is compensated for in your backpack by an additional set of batteries, which you simply need to have with you. Well, another negative feature of a compact camera is its compactness. There are a lot of different buttons and levers located on the small body of the soap dish. And these buttons and levers, naturally, are also quite small. That is why operating such a camera in difficult conditions can be very problematic. And if it’s frosty outside and you have gloves on your hands, then it’s practically impossible. And in the mountains there are often frosts, so it’s not so rare to work with gloves.
Lens
The lens is also an important part of the photographic equipment kit. He has no less important role in his work than the role of the camera itself. And perhaps even a big one. After all, it is the lens that creates the photographic image! The depth of field of the imaged space, viewing angle and much, much more depend on the lens. If you plan to shoot landscapes on a mountain hike, then the viewing angle of the lens is fundamentally important for you. After all, you probably want to convey in your photograph the vastness of the landscape unfolding before you! Of the huge number of wide-angle lenses that exist today, we recommend paying attention to the Nikon AF-S 10-24mm f/3.5-4.5G ED DX Nikkor. This lens is good for partial frame cameras. And for full-frame cameras, we recommend the Nikon AF-S 18-35mm f/3.5-4.5G ED Nikkor lens. It is quite light and comfortable. For many photographers it is the main one. You can also take with you to the mountains the usual so-called “fifty dollars” - a lens with a fixed focal length of 50 millimeters, for example Nikon AF-S 50mm f/1.4G Nikkor. It will be useful for taking portraits or not very panoramic landscapes. For telephoto lenses, that is, long-focus lenses, we can recommend Nikon 85mm f/1.4D AF Nikkor or Nikon 70-200mm f/4G ED AF-S VR Nikkor.
Now let's get back to the questions of amateurs. Why is it not possible, instead of three lenses - a wide-angle, a fifty-fifty prime lens and a telephoto lens - to take one universal lens with a large range of focal length changes? Well, for example 18-200 millimeters or even up to 300? The answer to this question is quite simple. More precisely, two answers. First. The quality of the image created by a universal lens is noticeably worse. What should we understand by image quality? This is sharpness, the absence of aberrations and distortions, as well as glare when shooting in backlight. What is aberration and distortion - read in other articles, we will not be distracted by this now. There are many sources. Second. Aperture. With a fast lens, you can, at a minimum, shoot handheld at low light conditions at fairly short shutter speeds. It also allows you to beautifully blur the background when shooting close-ups and portraits, that is, work with a small depth of field in the imaged space. A lens with a fixed focal length of 50 millimeters - most often this is a fairly fast lens.

Tripod
This piece of photographic equipment in the mountains in the eyes of beginners and amateurs may seem nonsense, even, in some respects, cause amazement. “Why did you drag this heavy piece of iron into the mountains?” - they will probably ask you. But, nevertheless, any experienced photography master will confidently tell you that serious landscape photography without a tripod is simply unthinkable. It is this accessory that gives you the opportunity to take high-quality pictures in low light conditions. Well, for example, at sunset or sunrise, in rain or fog, or even at night. A tripod will also help you shoot at a very small aperture. This is necessary in order to obtain ideal sharpness across the entire plane of the frame, from the foreground to the background. Without a tripod, it is difficult to take exposure bracketed shots to create an HDR image (read what this is elsewhere. If we talk about this, our article will significantly increase in volume).
Of course, for long and difficult hikes in the mountains, you want to choose a tripod that would weigh less and be more compact in size. However, it is very important to find a compromise between lightness, size and reliability and stability. An unstable and constantly shaking tripod is, one might say, its complete absence. Why is this even needed?

Light filters
Some modern photographers consider filters to be a rather controversial subject. They assure their colleagues that filters are not needed at all. That, supposedly, today, with the development of computer technology, a lot can be achieved even without these pieces of glass. “Why carry around these items that no one needs anymore in your bag?” - they think. But they are fundamentally wrong. Light filters are still needed today. And here's why.
Take, for example, a polarizing filter. It is needed to increase the contrast of the image and to get rid of glare on glare objects - for example, on glass or water surface. A polarizing filter also allows you to get rid of reflections in glass. But the problem is that such a filter combines very poorly with wide-angle lenses. The image created by the wide-angle + polarizing filter optical system may have uneven darkening in the frame and even spots. Of course, higher quality polarizing filters work better than low-quality ones, but they also cost an order of magnitude more.
Gradient filter. This accessory is needed in order to align areas of different brightness in the frame when shooting. Well, for example, heaven and earth. Well, who wants to get a whitish overexposure in the picture instead of a beautiful and juicy sunset? If you select and install a gradient filter correctly, then all the smallest details and subtle color shades will be preserved in your photo in the most natural way. And you will not have any need to resort to various editing in graphic editors during image post-processing on a computer. But, however, let’s make a reservation: it is best to use system gradient filters (Cokin, Lee, Singh-Ray). By the way, the Lee company produces a special system for attaching various filters without threads to the camera lens. In addition, some lenses do not have a thread for a filter due to their design features. Well, for example, the popular ultra-wide-angle lens Nikon AF-S 14-24mm f/2.8G ED. But if you purchase the above system, working with Lee SW150 series filters will be easy and convenient for you.
We would not recommend a gradient filter in a round frame with a thread. The point here is that with such a filter design it is very difficult to accurately control the dark area in the frame. Therefore, the darkened area may not be the one you need to darken. Well, for example, in the picture you can get a sky darkened from above, which will be overexposed in the area close to the horizon. Threadless gradient filters will help you avoid this.

For a photographer shooting in the mountains, we recommend having a neutral gray filter in your arsenal. And even several of them, differing in their density. ND filters give you the ability to vary your shutter speed, or the shutter speed at which you shoot, to varying degrees. The degree to which shutter speed increases directly depends on the density of the filter. A long shutter speed allows you to blur moving objects in the frame. Perhaps the most popular example of such photography is filming waterfalls or some other fast-flowing water stream. Well, let's say, a mountain river. Look how beautiful the pictures are. This one was made using a neutral gray filter with a shutter speed of 15 seconds. By the way, if you don’t have such a filter, but have the opportunity to linger at the waterfall until dusk, then you can take a similar long-exposure shot without the accessory described above.

Batteries
Never forget that without a battery, your camera can instantly turn into an expensive brick. If you decide to go filming in the mountains, and especially if you have planned a hike for several days, you need to calculate the approximate number of batteries you need. Well, when working directly, we recommend learning how to save battery energy. How? It's not as difficult as it might seem. Shoot less in Live View mode, and generally remember that running the display takes up quite a lot of energy. Also, do not forget that in the cold, batteries also lose their energy very quickly.
Photo bag
A trifle, it would seem - a photo bag. But that's not true. It is interesting that very little is written and spoken about them. But in vain. This is a very important piece of equipment for a photographer. The main task of a photo bag is to ensure the reliable safety of your camera equipment. It seems to us that it is not worth talking here about how delicate and expensive today's cameras and lenses are, that they are susceptible to external influences: rain and generally moisture, dust, heat and cold... The second task of a photo bag is convenient transportation of equipment. That’s why, when planning a trip to the mountains for photography, you need to pay special attention to your camera bag. Don’t put your DSLR and a couple of lenses in a handbag or in a plastic bag that was kindly provided to you at the checkout in the supermarket when you bought bread and milk there yesterday!

Of course, every photographer has their own preferences when it comes to camera bags. Some people are comfortable with some of their designs, others with others. But, nevertheless, we will try to give you some fairly general recommendations for their selection.
In order to take a walk in the mountains nearby and for a short time, well, for example, for one day, there is nothing better than a photo backpack. It can easily accommodate not only photographic equipment, but also a small supply of food and drink, as well as warm clothes and a raincoat or light jacket in case of rain or cold weather. By the way, a good photo backpack usually has special tripod mounts. With such a backpack it is convenient to travel in the mountains not only on foot, but also in a car.
But bags that are worn on a shoulder strap when traveling through the mountains are not the best option for a photographer’s technical equipment and equipment. Especially if it’s a large bag containing a couple of cameras, several lenses and a lot of small things. Such a bag is not only inconvenient on a mountain hike, but it also simply interferes with walking, as it puts a lot of pressure on the shoulder and dangles freely on the side, while swinging violently and touching tree branches.
You need to be especially careful when choosing a camera bag for long, multi-day, autonomous mountain hikes. The point here is that on your back you already have a fairly sizeable backpack with hiking equipment, a tent and much more. In this case, we can recommend that you put the necessary photographic equipment in a small bag placed in front, on the chest or on the stomach. This bag is usually attached to the straps of the main backpack. It provides quick and convenient access to your camera equipment, and if necessary, this bag can be easily stored in a backpack on your back.

But don't forget the most important thing. Whatever camera bag you use, whatever type it is, it must be waterproof. Moisture is the main enemy of all your camera equipment.
Well, I would like to say a few more words in conclusion. Someone said that in life you should try to try everything. Try going to the mountains with a backpack and a camera. Take a risk. We assure you, you will never regret it. Your risk and your fear will pay off with a huge number of interesting impressions, a lot of adventures and many photographs in which you will convey your mood to the audience. The mood you had in the mountains.
Filming in snow-capped mountains is rightfully considered one of the most difficult, because the weather here changes very quickly, and the conditions are not the best, if not extreme. We asked Kirill Umrikhin, a photographer specializing in travel and extreme sports sports Especially for Nikon users, Kirill also gave several useful “life hacks” for creating photos with snowboarders and skiers in motion!
Kirill, what time of day do you consider the most optimal for shooting in snowy mountains?
I really love beautiful light, and it can be at any time of the day. In the mountains, the weather changes at lightning speed. Sometimes it seems that there will be no shooting, everything is delayed and, suddenly, rays appear among the clouds, you manage to take a few shots, and again everything is covered in clouds. Mountains are mountains, but by far the most beautiful light is during sunset and sunrise.

Last year I managed to organize a shoot that I had been planning for two years. We filmed at dawn in Krasnaya Polyana. To do this, we had to stay overnight on the mountain in the house of the avalanche service workers. We woke up while it was still dark and went down to the lift station with flashlights.
We caught the first rays of the sun at the top. I waited until all the riders came out to the place where they would begin their descent. Everything went well and I managed to take several successful shots.

What features need to be taken into account when shooting on a slope?
When shooting on prepared slopes, first of all, you need to think about safety.
- Don't stand on the track, because it interferes with others' skiing.
- Calculate the trajectory of the snowboarder or skier in advance.
- Always pay attention to where the sun is located. Shots against the light in the snow are often more advantageous than shots against the light.

Are there optimal camera settings for photographing moving objects in the dark?
First of all, you need to think about endurance. If you shoot without flash, then the most critical shutter speed is 1/200 second. Anything longer will already be blurred.
When shooting with flash, the shutter speed cannot be more than 1/250 of a second.

Use flashes and other light that is around you. Flashes can be used on-camera or external and connected using radio synchronizers.

Sometimes I use two, three, or more flashes, but shooting with that much light is very difficult both technically and in terms of light exposure.

Three external flashes used

One external flash used
Kirill, how do you choose angles: on purpose or do you rely on chance?
I believe that proper composition is much more important than any settings in the camera (exposure). Competently constructing a frame is a skill that you learn all the time. Naturally, there are some ideas in your head, but you understand everything only when you get there. You have a platform - the world around you, you have means - a camera and a set of optics and, of course, you have knowledge. When you use these things wisely, you get a good shot. Sometimes you can do good photo, relying on luck. Sometimes you shoot from one point, and then take a step to the side and find that very position. In extreme sports, everything is a little more difficult than in, say, landscape photography. The trick lasts seconds and is often done only once. In this sense, there is no opportunity to “experiment”. You must clearly understand what you want to gain and apply this knowledge on the spot. Moreover, often you simply cannot walk and look for the right angle; walking in soft snow, drowning up to your neck, is simply impossible.

Sometimes it's difficult to set up a tripod in the snow. How to shoot at night with long exposures in such conditions?

To take a photo like this, you need a DSLR camera, a tripod, a camera remote, and patience. If we talk about a tripod, it is better to use a heavier and more stable one. At night there is often a strong wind, and the most unpleasant thing is losing sharpness due to camera shake. The legs of the tripod should be strong and you don’t need to bend them much, but rather just stick them deep into the snow and press them down. Even better is to find a compacted area. The remote control must have the ability to control shutter speed. In this photo it is approximately equal to an hour. In the center is the North Star. If you are well versed in the starry sky, then it is not so difficult to find. I advise others to use the excellent program for iPhone “Star Walk”. For example, you will always be aware of when and where the Moon sets. It is very important to shoot during the new moon, since during the full moon the sky is very “overexposed” by the reflected light of the Moon.
What would you advise photographers to look for when choosing a flash?
If you are shooting with an external on-camera flash, I recommend using it from the same manufacturer as the camera. It is safer and better to be safe than to have problems later.
If you want to shoot with off-camera flashes, you need to choose how to fire them - IR or radio.

IR - infrared rays, a method of communication between flashes. Its main drawback is its short range. This is the best option for a studio or urban sports, but it will not be suitable in the mountains.
Radio synchronizers (transmitters) are devices that connect the flash to the camera via a radio channel and operate at a distance of more than 100 meters. Convenient to use in the mountains and generally outdoors.
It doesn’t matter what kind of flash you use when shooting. For me, only a few parameters are important - its resistance to bad weather conditions, battery life, pulse length, power and weight.

We hope our readers have figured out the peculiarities of shooting at night. Let's talk about shooting during the day: how to avoid sun glare from snow and ice?
I would advise using all the opportunities that nature gives us. If there are glares, you need to use them! They, like drops on the lens, can create a very beautiful pattern!

I also recommend shooting with a polarizing filter. It is very bright in the mountains, and this will give you not only the basic capabilities of a “polar explorer” - deeper and bluer skies. You can also shoot with the aperture wide open, controlling the depth of field.

To sum up our interview, what basic advice would you give to a photographer going to the mountains to shoot in winter?
- First of all, I would advise you to dress warmly. There is nothing worse than being cold while shooting or thinking not about photography, but about where you can warm up
- Take spare batteries and flash drives
- The equipment tolerates light snow well, but during heavy snowfall it is better to cover the camera with a cover
- I recommend shooting in Raw. You will always have a chance to correct the settings if you forgot to change the parameters or were in a hurry and did not set the desired exposure
- During cloudy weather, I advise you to increase the contrast of your images during post-processing. For example, you can do this in Nikon Capture
- Always use special photo backpacks that are protected from moisture
- Stock up on cloths for wiping your optics and camera.
- Use a lens hood
- Lifehack: “A shower cap that you can find in your hotel bathroom is ideal for shooting in bad weather”
- After frost, do not rush to take your camera out of your backpack or case. Allow it to warm up gradually, otherwise it will become covered with condensation and moisture may get inside, which will lead to failure.

If you have ever been to the mountains not on a bus tour, where you are given twenty-six and a half minutes and not a second more to explore the area, stand in queues of photographers at the only observation deck and actually take the photo, you probably felt that the mountains are absolutely unique place.
Mountains are an element. Moreover, an element that is not always friendly, but at the same time allows you to see and photograph things that you will not see or photograph anywhere else.
I should note that this article will focus specifically on landscape photography, since shooting portraits requires a slightly different approach. When heading to the mountains and planning to take photographs there, you need to be prepared for a lot, and not only in terms of photographic equipment, so I will look at the problems that I personally encountered while shooting in the mountains, and then I will tell you what it is advisable to take with you.
I. The most likely problems in the mountains
1.1. Sudden weather change
To illustrate, I’ll start with a fresh example from life. This winter we went to a mountain town in Germany, and one day we went into a cafe in the city itself, sat in front of a glass display window overlooking the street, and began to enjoy the views.
Within three minutes the following happens: first it starts to rain, it suddenly intensifies, a hurricane rages, people are almost blown away along with their umbrellas, thunder and lightning, an alarm, somewhere a child gets scared and starts crying, the rain turns into hail and a blizzard, and then that’s it It subsides, only snow covers the streets abundantly. We sat there with cups in our hands and our mouths open, and we remained that way. They promised, of course, that the weather would change that day, but personally I had the feeling that someone above had simply pulled the lever - there was no time to delay.
Actually, the same thing happens in the mountains themselves, and very often. If the weather doesn’t change for several hours during your outing, consider yourself very lucky. Once, traveling along the already southern ridges, within a few hours we managed to catch the scorching sun, cloudy weather, wild rain, fog and again the scorching sun.
All this creates the following difficulties:
- You need to be prepared for anything and take plenty of equipment with you.
- Get ready for some exposure fun: if you have to change settings five times in three minutes to get the exposure right, that's no surprise.
I would also like to point out that shooting the sunset sky from the top of a mountain is an amazing experience, but unless you are camping with tents and enough food for several days, I do not advise you to risk waiting at the top until the sun goes down for such a shot. It can be unsafe to be in the mountains at night. It's not safe there even during the day.

1.2. Safety
First of all, I do not advise you to go to the mountains alone. If you know your way around mountain maps, that’s great, but it’s still worth taking at least one more person with you if you’re not going in a group, and preferably from the locals. It can be very easy to get lost in the mountains. One day I went alone along the famous Crimean route in the Grand Canyon.
I successfully completed the route, which turned out to be very short - only about a kilometer - and, having reached the observation deck, which, according to a tip, should have been 200 meters from the lake, I decided that it was certainly very beautiful there, but somehow rather low. In the mountains it’s hard to be oriented in space, and I thought that maybe observation deck- it is higher, and this is just a transit point.
I turned onto the forest road, followed the marks on the trees, and by the second hour of walking I began to understand that after all, something was wrong here, and no “grandmothers with children” would go that far. There was a cloud on the top of the mountain, and already at a distance of 10-20 meters absolutely nothing was visible; the photo below was taken exactly there. Luckily for me, the plateau turned out to be inhabited; there was a so-called “tea house”, where they warmed me up, gave me tea and sent me down to the house.
If there was no house, I would probably easily get frostbite and continue the adventures. In general, I hope you understand that you don’t need to do this. Be sure to take a guide and a map with you. In the heat of photography, you may simply not notice that you have wandered somewhere wrong.

The weather in the mountains often throws up surprises, sometimes it’s very easy to get lost
It is also worth noting that in the mountains you risk meeting not only squirrels and butterflies, and it is not daisies that grow there. In the Crimean mountains, for example, there are wild boars and snakes, as well as wonderful poisonous insects such as centipedes, the photo of which I won’t even show, because... there may be women and children here.
Speaking of plants, in addition to the well-known wolfberry, in the Crimean mountains, for example, you can find Yasenets, also known as Burning Bush. It’s a very beautiful flower, you’ll probably want to take it off as a souvenir, but it’s better not to. Touching this plant and even getting in close proximity to it during flowering can result in severe chemical burns.
So, let's finish with safety precautions for now, let's move on to purely photographic problems.
1.3. Unobvious prospect
If you've ever shot in the mountains, you've probably encountered the problem of blending the background and foreground. If you shoot focusing at infinity, that is, some landscape located at a distance from you may turn out to be visually flat. I advise you to find some object in the foreground, such as a tree, to emphasize the perspective.
If there is no such object, try to wait until the sun is not at its zenith and will create shadows on the mountains that will visually form layers in your image. Also, to create perspective, the “haze” that is so hated by many, which will be discussed later, is used.

The tree in the foreground helps emphasize depth in the frame
1.4. The shutter does not operate correctly
If you shoot with a film camera, you may encounter a problem that I once encountered when shooting with an old medium format Kyiv-60 in the cold (temperatures at the top of the mountain are much lower than at the bottom).
The fact is that my lubricant simply froze. Plus there is a lag in the mechanism of not the most reliable camera on Earth, and at short shutter speeds the shutter simply did not have time to work at shutter speeds of 1/500 and 1/1000 of a second. The frames looked very mysterious: they were simply half black. So, if you don’t want to get ruined footage, firstly, choose a more reliable camera with you on a hike, secondly, check it before the trip in a workshop or yourself if you know how, and thirdly, if you’re not comfortable with it Sure, shoot at 1/250 maximum.
1.5. Cold
This problem is especially relevant when shooting in the mountains in winter with a digital camera. Firstly, batteries discharge much faster in the cold, moreover, the cold can even damage them, so it is advisable to keep spare batteries somewhere closer to the body, in your pocket, for example. Having brought the camera home from the cold, it is advisable not to turn it on for a while, several hours, to allow it to warm up and allow the condensation (water sediment) that forms during a sharp temperature change to drain and can harm optics and electronics.
In general, you should try to protect your camera from sudden temperature changes. Do this Not necessary: we filmed for half an hour in the cold - we ran into a cafe to drink mulled wine, while wiping away the water droplets with our sleeves and looking at what we had shot, and then we ran again to take photographs. When moving the camera from cold to warm, I repeat, do not turn it on, let the condensation evaporate. You can read more about shooting in the cold, quite an interesting article.

1.6. Strong wind at the top
If you are going to reach the top of a mountain or an intermediate open plateau for shooting, be prepared for strong winds that will make the shooting process difficult. It affects both the stability of the camera and the physical comfort of the photographer. I will describe below what you need to pay attention to and what to take with you.
1.7. Difficulties in metering exposure
When the most beautiful panorama of mountains for many kilometers around opens up in front of you, it’s not difficult to lose your head with delight. Especially if you shoot on film, anticipating the most beautiful wall-to-wall photo wallpaper, and don’t see the result right away. The fact is that in the mountains you may encounter such a problem as large differences in illumination zones, as in the example below.

Sharp changes in illumination levels at the peaks and base
As you can see, the tops of the mountains are lit very well, but the forest in the foreground is simply drowned in darkness. In addition, it is very difficult to carry out correct exposure when there are snowy peaks around, actively reflecting the light falling on them. Therefore, firstly, I highly recommend taking a digital camera with you, at least to measure the exposure.
I had to make an adjustment down a couple of steps to reach a normal lighting level, but this adjustment took the less illuminated forest strip into deep shadow. As a solution to the problem, it is possible to use the HDR technique. In this case, exposure is carried out separately in the snow-capped mountains and separately in less illuminated areas at the foot of the mountain.
II. What to take with you
So, above we looked at the main problems that you may encounter in the mountains. Based on this, what should you have with you when planning a mountain photo excursion?
2. 1. Photographic equipment
Lens
If you're going to be shooting landscapes, which is what we're talking about here, you'll need a wide-angle lens. In the mountains, even a wide-angle usually seems insufficient, because in front of you, as far as the eye can see, there is endless space, and you immediately want to shoot panoramas. Of course, a telephoto lens may also be useful to you, but with much less probability, unless, of course, you climb the mountains for portraits or don’t want to look at that little house on the opposite peak.
If it’s not too hard and you don’t mind, you can take it, but if you have to choose between two options, choose the wide-angle. Also, for creative experiments in the mountains, a fish-eye lens can come in very handy. These lenses, moreover, are usually not heavy at all, and you will thank the manufacturer for this if you and all the equipment have to crawl up on foot for several hours in the heat.

And yes, a purely shooting point - for landscapes, choose a fairly narrow aperture, preferably f/8-f/16, so that a large area falls into the sharpness zone, and there are more details in the picture. The main thing is not to overdo it - at f/22 sharpness can be reduced due to diffraction.
Tripod
As I mentioned above, the wind is usually very strong at the top of the mountain and on the open plateaus. Therefore, although it is difficult to carry unnecessary equipment with you up the mountain, I advise you to take a tripod.
Because if, having reached the top, you find that there is no tree there to lean on in order to gain stability, and you yourself cannot compensate for the force of the wind when shooting handheld, especially if it is already getting dark, or you want to use polarizing filter, or a beautiful cloudy pre-storm sky spreads out in front of you, it will be very disappointing.
Moreover, it is advisable to choose a special tripod with a hook for weighting at the bottom. You can hang a bag of rocks or a camera bag on this hook, and the tripod will be much more stable. It will also be useful to you if you want (and you probably will) to shoot a panorama. Believe me, there are all the possibilities for this.

Tripod with hook for hanging loads
Hood
However, a lens hood does not always help; if you shoot directly in front of the sun, then in the case of some lenses, especially budget ones, glare will still appear, but it is better to play it safe if possible.

Hood
Photo filters
In the mountains, the most noticeable phenomenon is "haze" appears when shooting distant objects. The cause of haze is the scattering of light on particles and air molecules suspended in the air. Also, the cause of the “blue” tint in the image is ultraviolet radiation, the influence of which increases in the mountains. As altitude increases, the decreasing layer of the atmosphere absorbs ultraviolet radiation to a lesser extent.
With an increase in altitude for every 1000 m, the level of ultraviolet radiation increases by 10% - 12%. The human eye is not as susceptible to ultraviolet radiation as the camera matrix and especially film.
Sometimes “haze” can help enhance the perspective of an image, due to the fact that closer objects appear in the frame as sharper and more contrasting, and more distant ones appear as less contrasting and covered with a bluish veil. However, some choose to fight it.
Filters commonly used to solve these problems are:
- Ultraviolet (UV), which allows you to partially block ultraviolet radiation. In my experience, it has no visible effect on the blue tint or haze. It plays a rather protective role, which, however, is no less important when shooting in any conditions.
- SkyLight filter, which gives the photo a warmer tone due to the fact that it is tinted in a light pink color, and also blocks ultraviolet radiation. Again, you can’t expect any stunning effect from it.
- Anti-haze filter that almost completely blocks ultraviolet radiation. Frankly, I haven’t personally worked with it, but I doubt that it will be able to remove exactly the “haze”, since it is caused not only by UV light.

Sometimes haze helps to emphasize perspective and depth in the frame
In my opinion, the best choice in this situation is polarizing filter, the main purpose of which is to remove unwanted reflections and glare from non-metallic surfaces (for example, water and glass). It converts polarized light resulting from reflection from any non-metallic surfaces.
In addition, this filter gives several more effects that are more interesting for us in the situations considered: it darkens the sky, giving it a deeper blue tint, makes the colors in the picture more saturated, and images with it look more contrasty. Thus, with its help you can partially neutralize the visual “consequences” of haze - reduced contrast and fading of colors. You can read more about filters.
I’ll just note that, firstly, for a camera with autofocus you need to choose a circular polarizing filter, secondly, when using it you need to make an exposure correction (it reduces the amount of light passing through it), and thirdly, with wide-angle lenses need to use “thin” polarizers to avoid the vignetting effect. I love this filter, and the only downside in my opinion is the price. However, it's worth it.
There is also another problem that you may encounter in the mountains, for which a “polarizer” can also be useful. Everyone knows that shooting a landscape against the sun on a clear day is a recipe for a white, overexposed sky. And since in the mountains you don’t always have the opportunity to shoot in the other direction, wait until colorful saving clouds run across the sky, or wait until the sun goes behind you, this can seriously damage the final result.
The “polarizer” will darken the sky and be able to remove some of the glare, although, of course, ideally you need to find an angle where the sun is at an angle to the camera, and not directly opposite.
Batteries
In the mountains, you don’t often come across sockets for recharging batteries, and there are stalls selling batteries at every turn, and therefore many photographers prefer to take a fully mechanical film camera with them to avoid this problem. If you have a digital camera and you are going on a photo walk for more than a couple of hours, make sure that you have at least 2 spare batteries with you.
As mentioned above, if you shoot in the cold of winter, the batteries will drain faster, making this problem even more pressing. In any case, there are never too many batteries.
Photo bag
When choosing a camera bag when shooting in the mountains, you should approach it very responsibly. I highly recommend that you get a photo backpack. If you are going on a hike for several days, put the camera in your main tourist backpack, wrapping it in a special waterproof fabric, which can be found in specialized stores. And under no circumstances take a shoulder bag with you.
No, of course, nothing bad may happen to you, but, as you know, God protects the protected. The first few times I made forays into the mountains with a shoulder bag, but there were several moments when I did not collapse along with all my belongings into a cliff or into a mountain river, only thanks to the miracles of tightrope walking I showed.
When you climb slippery rocks, you need, firstly, to have your hands free, and secondly, so that nothing disturbs your balance, and a heavy shoulder camera bag will pull you to one side, and if it accidentally slips off your shoulder, When you're hanging on rocks, it's more than likely to become unstable. So save yourself and buy a photo backpack.
It should also be noted that a backpack should be chosen with a waterproof coating and protection of the internal compartments from moisture, because, as I said above, predicting the weather in mountainous areas is quite problematic.

A photo backpack is indispensable when shooting in the mountains
2.2. Non-photographic equipment
In addition to photographic equipment, you need to carry a number of things with you to ensure your own safety and to protect your equipment.
Raincoat
When going to the mountains, take a raincoat. Of course, it is better to take a special raincoat for photographers, which also protects the camera and allows you to continue shooting even when it rains, but if you don’t have one, buy a few of the simplest raincoats for 20 rubles; they can be found in almost any hardware store. What’s funny is that I couldn’t find them in Crimea. If, like me, you find yourself without a raincoat, take a regular bag with you. When going to the mountains, I take with me at least a large T-shirt bag in which I can wrap my photo bag if the weather suddenly turns bad.
Map
A map or navigator is something that will definitely come in handy, even if you are going in a group or with a guide. Mountains are not static terrain; it often happens that where there used to be an animal trail, bushes now grow, the ropes for descent have been cut, and the main road is overgrown or blocked. In any case, even to orient the rescue service, you will need to know your approximate location.
Telephone
I think no additional comments are required here. Make sure your phone is fully charged because in my experience there aren't many people at the top you can ask for a cell phone from.
Fire
If you do get lost or are delayed so long that it gets dark and you don’t have time to get onto the highway or to an inhabited area, a fire can come in handy, since it’s very cold in the mountains at night, this will give you the opportunity to warm up food or drink, and, in the end Finally, signal the rescuers. Still, not everyone knows how to use flint, so have matches and a lighter with you in case any of these fail.
And, in my experience, when we walked naked to the waist along a mountain river with a water temperature no higher than 5 degrees Celsius, because... We couldn’t get around it; a small fire for drying socks really helped us avoid getting cold or dying. Just please remember the rules for making fires in forests. You cannot imagine the area of burned forest in the mountains of Crimea, and all because people do not extinguish fires properly or build them incorrectly.
Clothes and shoes
As I already said, the weather in the mountains is unpredictable, and therefore you should definitely have spare warm clothes with you, thermal underwear if you are going to the mountains in winter, a waterproof windbreaker, a headscarf as protection against overheating and forest ticks in the summer, and comfortable shoes, holds your foot firmly and has a non-slip sole.
Even if when you leave the house you only see people in flip-flops, shorts and Hawaiian shirts, do not give in to temptation and play it safe, sometimes your life and health depend on it, especially on shoes. I focus on this because, as a photographer myself, seeing beautiful views, very often I forget about everything in the world.
Gloves
When you shoot in the mountains in the cold, you stop feeling your hands after a few seconds, which can lead to frostbite. And wearing thick gloves is so terribly inconvenient to take off that you just want to take them off, “well, just for a couple of shots,” and then you won’t even notice how you start to freeze. I found a good solution for myself in the form of fishing gloves - those with cut off fingers and a Velcro mitten that goes on top.
You take off the mitten for a couple of seconds, take a photo, and put it back on. As you know, mittens retain heat much better than regular gloves. In the summer, I took with me soft cycling gloves with “cut” fingers so as not to skin my hands on the stones.

These gloves are very convenient to wear in the mountains in winter.
Food and water
When you are going to the mountains, be sure to take water with you in reserve. From my own experience, I must note that if in winter it is still possible to melt snow in case of water shortage, then in summer, when half of the route the water runs out completely, and all the streams on which hopes were pinned have dried up, it is very difficult to go further, and it’s no longer the same. that I don’t want to shoot, I don’t want to live anymore.
Dehydration is a scary thing. Don't be afraid to overload, it's better to bring excess water home than to go without. In spring and autumn it is much easier to find mountain rivers and streams and replenish supplies, but in the hot summer they become smaller or disappear completely.
Walking up the mountains, especially with photographic equipment, burns a lot of energy, and therefore you should take something with fast carbohydrates, such as chocolate, to restore strength. If you are going for several days, then, of course, the diet must be complete, with meat and cereals. But even if you are going for several hours, ensure your comfort by taking something for a snack.
First aid kit
Even if you are going to the mountains for a short time, do not be lazy and take at least hydrogen peroxide, a bandage and a patch with you. Because a couple of hours of easy walking in the mountains can turn into torture with a twisted leg or a rubbed callus, and there will be no time for filming. Well, personally, as a particularly lucky character, I managed to find glass with my hands in the mountains and valiantly cut myself on them, and then walk around and scare everyone with my bloody fingers. In general, take a first aid kit. It doesn't take up much space.
Conclusion
I hope I didn’t scare you too much with my article. Mountains - dangerous place, but if you follow safety precautions and choose the right equipment, then all these difficulties with lifting, bad weather, cold, etc. pay off a hundredfold, and you will get the most beautiful, unique shots of the impossible beauty of places.
For me, for example, there is nothing more fascinating than mountain landscapes, and, as they say, only mountains can be better than mountains. And remember that in addition to panoramas, the mountains have many interesting corners, small locations and wonderful natural phenomena, which also deserve your attention!

Mountain rivers are an excellent subject for photography
I wish you good luck! It would be interesting to hear your stories about photography in the mountains, and share your experiences!
Photographing mountains and natural landscapes is a specific genre of photography, aimed at people who are well prepared physically and psychologically. In addition to a number of technical difficulties when working, you should also take into account the fact that you still need to get to the photography location. Sometimes you have to move through difficult mountainous terrain over fairly long distances. If you are confident in your own abilities and are ready to try your hand at photographing mountain landscapes, the tips and tricks outlined in this article will help you get high-quality images.
The main difficulty when shooting in the mountains is problems with color rendering. Live you can see the blue sky, white mountains and green forest, but in the pictures the sky will turn out faded, the forest will be dark, the mountains will be gray. This is due to the characteristics of the air in the mountains and the large distances between shooting objects. To avoid these and a number of other problems, you need to be able to correctly adjust the photosensitivity, shutter speed and aperture of the camera, as well as use additional accessories.

Specifics of photosensitivity settings
Light sensitivity in modern cameras is indicated by the abbreviation ISO and a number next to it. The lower the number, the less time it takes to capture a certain amount of light. When shooting at high ISOs, you can use a fast shutter speed, but this introduces digital noise. This is what a photo taken at ISO 3600 looks like.

The grain is clearly visible on it. The recommended ISO value for mountain photography is between 100 and 400. The big advantage of a digital camera over a film camera is that the light sensitivity of the sensor can be changed in a few seconds. This allows you to take several pictures in different modes and select the best quality one.
High ISO values must be used in situations where there is not enough available light for a normal exposure, and the subject is moving, or the photographer is unable to hold the camera still for the required period of time. If, on the contrary, the task is to blur the movement, emphasizing dynamism, then the ISO value should be set to the minimum possible value.
Setting the shutter speed for shooting in the mountains

Shutter speed in photography is the amount of time it takes for light to hit the camera sensor. In modern cameras it can vary from thousandths of a second to several tens of seconds. With this setting you can achieve both high definition and blurred images. The faster the subject moves, the slower the shutter speed should be. When photographing skiers, professionals recommend using a shutter speed of no more than 1/1000 of a second. The exception is situations when it is necessary to obtain a blurry photograph in order to emphasize the dynamics. In this case, the shutter speed needs to be made longer.
Here are two shots taken at 1/1000 second and 1/500 second respectively.

In the second image, the snow trail of the skier has blurred edges, but in the first, all parts of the image are quite clear. You should also take into account the distance to the subject - the closer it is, the more space it takes up in the viewfinder, and the shorter the shutter speed should be to get a high-definition image. If the skier is moving to the side of the photographer, then the shutter speed should be shorter than when the subject is moving towards the camera.

The longer the shutter speed, the greater the demands placed on the stability of the camera, because any movement of the camera will make unnecessary adjustments to the final result. The photo will be out of focus and blurry. This is especially true for shooting with long focal length lenses. A tripod will help solve the problem. When you don’t have it at hand, and you need to take a picture immediately, it’s worth using several well-known techniques to achieve good camera stabilization.

If there is a tree, stone or other suitable object nearby, then you need to rest your shoulder or elbow on it. Before releasing the shutter, it is advisable to hold your breath, and pressing the button itself should be smooth, without sudden movements. It is unacceptable to get blurry pictures due to the fact that the photographer cannot properly fix the camera while taking photographs.
What aperture value should you use when shooting in the mountains?
The aperture value is the size of the hole through which, after opening the shutter, light enters the photosensitive element of the camera. Beginners often have problems when working with this parameter. This is because the aperture value is expressed as a fraction F/number, and many people do not understand its meaning. The larger the number in the denominators of the fraction, the smaller the hole in the diaphragm will be, the less light hits the photosensitive element. For example, an aperture of F/1.4 will have a larger opening than an aperture of F/8.
This indicator also affects the sharpness in the frame: the smaller the aperture hole, the larger the sharpness zone will be, and vice versa - a large hole blurs all objects except the one that is in focus.

Look at the distant mountain in the image. In the first photo you can clearly see that the background looks more blurred, in the second the image is clearer.
How to achieve the correct exposure?
Exposure is adjusted by changing the aperture value, exposure time and sensor sensitivity. You can get high-quality images if you achieve the correct ratio of these three parameters. If the exposure is insufficient, the photo will be too dark, and if it is overexposed, it will be overexposed.

In the first photo the exposure is insufficient, in the second it is normal, in the third it is overexposed.
Each of the parameters that affect exposure should be changed for a specific purpose. Thus, they usually do not increase the amount of light entering the matrix by increasing the aperture opening, because at the same time the depth of field and focusing will be disrupted. To do this, increase the holding time.

Changing the aperture value is mainly used to adjust the depth of field. Please note that professional photographers do not increase the exposure time when photographing a moving skier in poor lighting conditions - this always leads to blurring of the frame. To achieve the correct exposure in such a situation, you will have to influence the ISO values. When shooting in the mountains, do not take pictures thoughtlessly - try to understand in advance what effect this or that action will lead to.

Equipment and equipment that you should take with you to the mountains
- Lens – For shooting landscapes and dynamic ski slopes, it is better to take a wide-angle lens. It will allow you to capture more space and make it possible to take a panoramic photo. A long focal length lens will come in handy if you decide to shoot a portrait in the mountains.